将思维导图mind-map嵌入wordpress网站的全过程(持续更新)
- 文档
- 2024-01-26
- 289热度
- 4评论
问题起源
我想写小说,想要写大纲,所以想在网站实现思维导图的功能。
在git上找到了开源的思维导图:https://github.com/wanglin2/mind-map
它的界面看起来非常美好,但是好像打开保存的是本地的文件。我想加打开云端数据的按钮,它会弹出一个对话框,让用户选择数据库中当前账号下的思维导图,打开它。
保存也希望能保存到wp的数据库中。
这个思维导图的项目文件类型就是json,我想可以将json转化成字符串,直接保存成文章的内容。
实现过程
将思维导图嵌入页面
用container直接嵌入
git上的思维导图在打包后形成index.html和dist文件夹,dist文件夹下有一堆css和js。
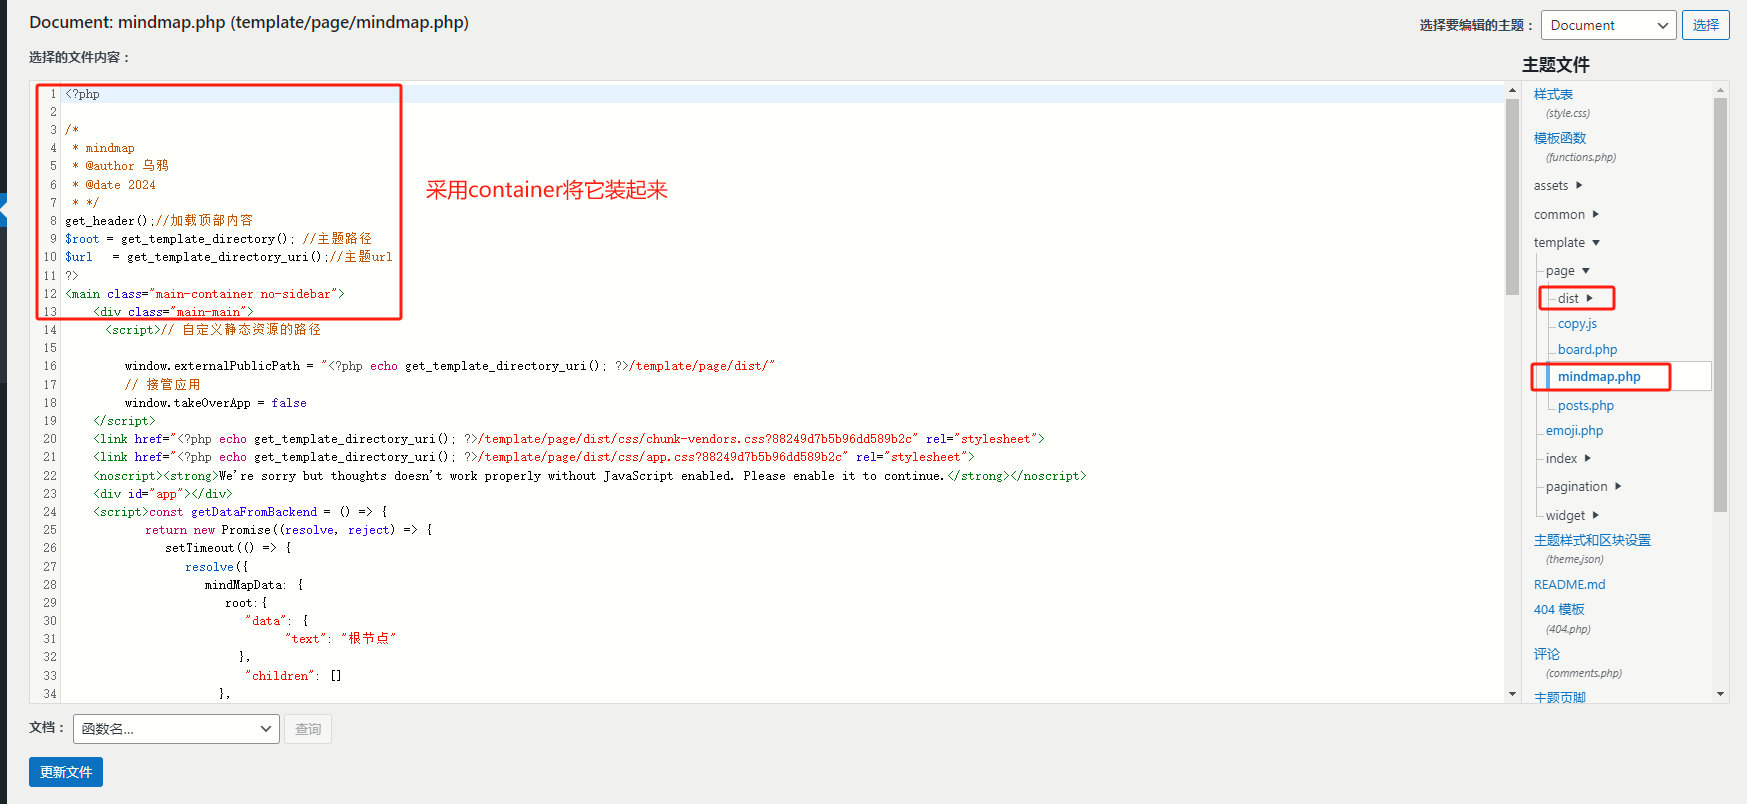
我将index.html改写成php的样式,放在template文件夹下:

具体来说,在script前面加上:
<?php

/*
 * mindmap
 * @author 乌鸦
 * @date 2024
 * */
get_header();//加载顶部内容
$root = get_template_directory(); //主题路径
$url  = get_template_directory_uri();//主题url
?>
<main class="main-container no-sidebar">
    <div class="main-main">
在最后加上
</div>
</main>
<?php
get_footer();
?>
中间,由于index.html在引用css和js时,采用的都是绝对路径,例如:
  <link href="dist/css/chunk-vendors.css?88249d7b5b96dd589b2c" rel="stylesheet">
  <link href="dist/css/app.css?88249d7b5b96dd589b2c" rel="stylesheet">
我们需要把它改成相对路径,利用wordpress定义的get_template_directory_uri()函数,可以获取到主题所在的目录。这样上面的例子要改成:
<link href="<?php echo get_template_directory_uri(); ?>/template/page/dist/css/chunk-vendors.css?88249d7b5b96dd589b2c" rel="stylesheet">
<link href="<?php echo get_template_directory_uri(); ?>/template/page/dist/css/app.css?88249d7b5b96dd589b2c" rel="stylesheet">
然后,需要在主题的include/config.php中,声明这个新的思维导图页面模板:
const PAGES = [
    '文章聚合' => [
        'template'  => 'template/page/posts.php', //模板文件
        'dependent' => [
            /*
             * 依赖的样式
             * 可以使远程资源
             * */
            'styles' => [
                '/common/page/page.css'
            ],
            /*依赖的脚本*/
            'script' => [

            ]
        ]
    ],
    '留言板'   => [
        'template' => 'template/page/board.php',
    ],
    '思维导图'  => [
        'template' => 'template/page/mindmap.php',
        'dependent' => [
            /*
             * 依赖的样式
             * 可以使远程资源
             * */
            'styles' => [
                '/template/page/dist/css/app.css',
                '/template/page/dist/css/chunk-6d4e8018.css',
                '/template/page/dist/css/chunk-7babbe51.css',
                '/template/page/dist/css/chunk-vendors.css'
            ],
            /*依赖的脚本*/
            'script' => [
                '/template/page/dist/js/app.js',
            ]
        ]
    ]
];
css问题
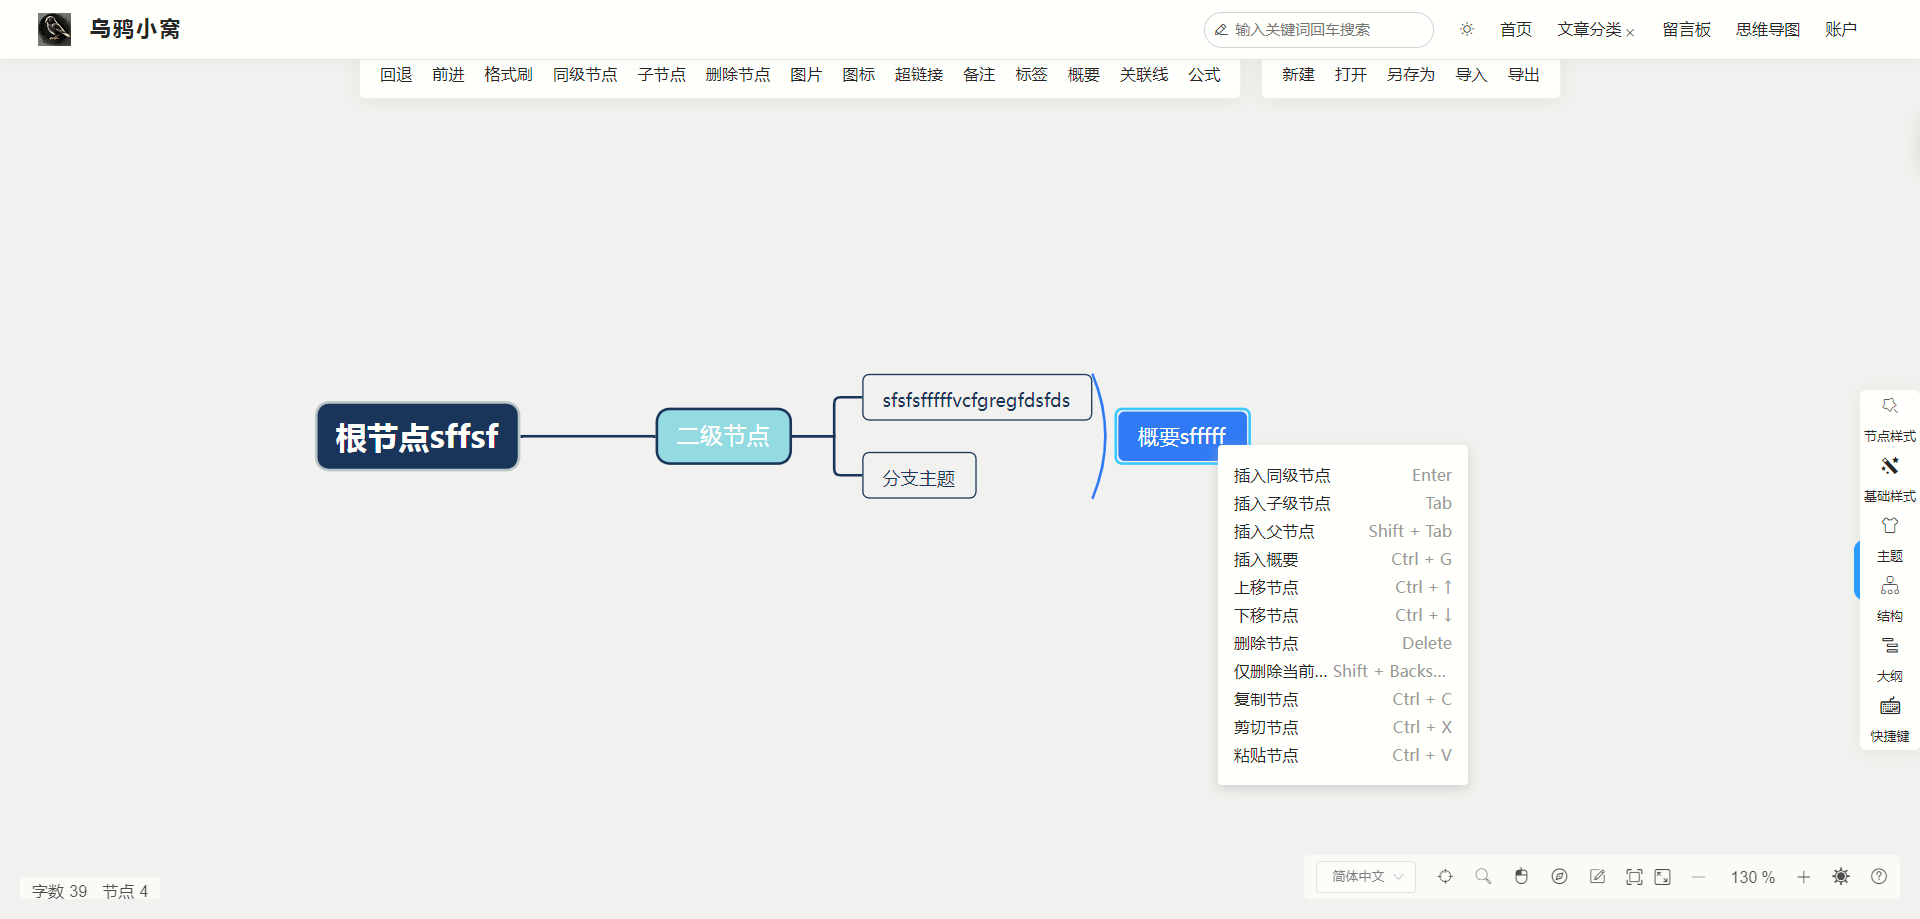
嵌入以后发现css样式不对,顶部工具被挡住了,右键菜单的字体和颜色也不对。

这是因为模板调用的css优先级比样式表的css优先级要低,导致被样式表里的*开头的万用样式代替了。
因此,修改css样式表,在通用样式 *{} 的后面加上:
/* mindmap相关 */

.contextmenuContainer .item .desc[data-v-dbfd708e], .contextmenuContainer .item .name[data-v-dbfd708e] {
    font-size: 14px;
    font-family: PingFangSC-Regular,PingFang SC;
    font-weight: 400;
    color: #1a1a1a;
    white-space: nowrap;
    overflow: hidden;
    text-overflow: ellipsis;
}
.contextmenuContainer .item.danger .name[data-v-dbfd708e] {
    color: #f56c6c;
}
.contextmenuContainer .item.disabled .name[data-v-dbfd708e] {
    color: grey;
}
.contextmenuContainer .item[data-v-dbfd708e] {
    position: relative;
    height: 28px;
    line-height: 28px;
    padding: 0 16px;
    cursor: pointer;
    display: flex;
    justify-content: space-between;
}
.contextmenuContainer .item [data-v-dbfd708e] {
    position: relative;
    height: 28px;
    line-height: 28px;
    padding: 0 16px;
    cursor: pointer;
    display: flex;
    justify-content: space-between;
}
.toolbarContainer .toolbar .toolbarBlock[data-v-00dc8188] {
    display: flex;
    background-color: #fff;
    padding: 10px 20px;
    border-radius: 6px;
    box-shadow: 0 2px 16px 0 rgba(0, 0, 0, .06);
    border: 1px solid rgba(0, 0, 0, .06);
    margin-right: 20px;
    flex-shrink: 0;
    padding-top: 60px !important;
}
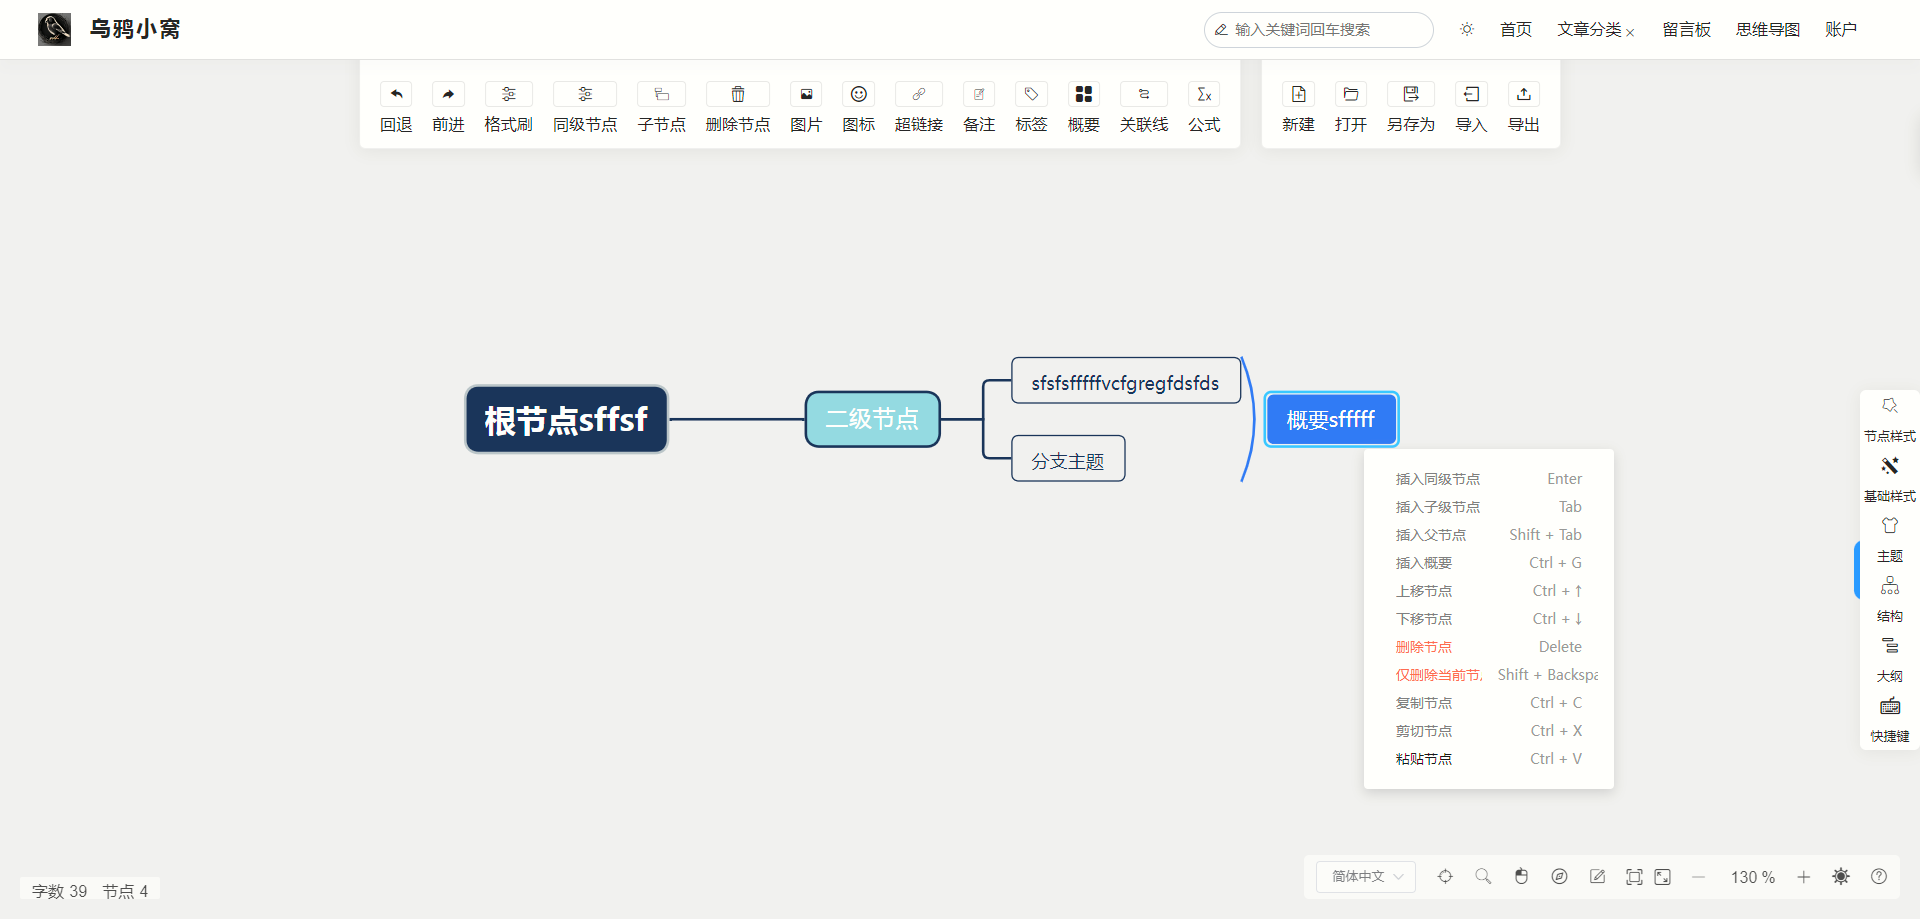
样式就正常了。

vue2 nodejs 部署
参考 https://zhuanlan.zhihu.com/p/349318513
https://www.runoob.com/w3cnote/nvm-manager-node-versions.html
部署nodejs时需要注意版本,这个wanglin2/mind-map使用的是17以及以下的nodejs。
我采用了nvm管理nodejs的版本,选择了16的nodejs。
由于中间有个库的版本对不上,所以在npm i时要加上--legacy-peer-deps
为了方便测试,我先将wanglin2/mindmap部署在了本地,然后再npm run serve后,可以在http://localhost:8080 访问到思维导图的页面。
修改vue代码,添加几个按钮
wanglin2/mind-map中,采用了woff的图标。我在网上找了一个在线的工具,可以打开查看他提供的woff和ttf图标文件。
https://segmentfault.com/a/1190000020121850
在mind-map项目中,上方的按钮在Toolbar.vue中。在html部分加入:
    <div class="toolbar" ref="toolbarRef">
        <!-- 之前的组件 -->
        <!-- XXXXXXXXX -->
        <div class="line"></div>
        <div class="toolbarBtn" @click="$bus.$emit('showImportOnline')">
          <span class="icon iconfont iconwenjian"></span>
          <span class="text">{{ $t('toolbar.openFileOnline') }}</span>
        </div>
        <div class="toolbarBtn" @click="saveOnlineFile">
          <span class="icon iconfont iconwangzhan"></span>
          <span class="text">{{ $t('toolbar.saveSameFileOnline') }}</span>
        </div>
        <div class="toolbarBtn" @click="$bus.$emit('showExportOnline')">
          <span class="icon iconfont icondaochu1"></span>
          <span class="text">{{ $t('toolbar.saveFileOnline') }}</span>
        </div>
      </div>
    </div>
    <ImportOnline></ImportOnline>
    <ExportOnline></ExportOnline>
这里添加了一条竖线+3个按钮,其中在线导入、在线另存的功能需要加弹窗,而直接在线保存的功能不需要弹窗。
对于需要弹窗的在线导入导出功能,在scripts中加入:
import ImportOnline from './ImportOnline'
import ExportOnline from './ExportOnline'
export default {
  name: 'Toolbar',
  components: {
    ImportOnline,
    ExportOnline
  },
然后,新建ImportOnline.vue文件,内容为:
<template>
  <el-dialog
    class="nodeImportDialog"
    :title="$t('toolbar.openFileOnline')"
    :visible.sync="dialogVisible"
    width="40%"
  >
  <div class="popup">
    <ul class="articleList">
      <li class="articleItem" v-for="article in articles" :key="article.id" @click="selectArticle(article)">
        {{ article.title.rendered }}
      </li>
    </ul>
  </div>
  </el-dialog>
</template>

<script>
import axios from 'axios';
export default {
  name: 'ImportOnline',
  data() {
    return {
      dialogVisible: false,
      articles: []
    };
  },
  watch: {
    dialogVisible(val, oldVal) {
      if (val && !oldVal) {
        this.articles = []
        this.fetchArticles();
      }
    }
  },
  created() {
    this.$bus.$on('showImportOnline', this.handleShowImport)
  },
  beforeDestroy() {
    this.$bus.$off('showImportOnline', this.handleShowImport)
  },
  methods: {
    handleShowImport() {
      this.dialogVisible = true
    },
    getCookie() {
      // 从本地拿wordpress登陆时产生的jwttoken,token相关部分在本文中也有说明。
      const cookieName = 'jwt_token';
      // 获取 Cookie
      let reg = RegExp(cookieName + '=([^;]+)')
      let arr = document.cookie.match(reg)
      if (arr) {
        this.cookieValue =  arr[1]
        console.log(this.cookieValue)
      } else {
        this.cookieValue = document.cookie
      }
    },
    fetchArticles() {
      // 获取JWT令牌,假设你已经在登录时将令牌存储在本地存储中
      this.getCookie();
      const jwtToken = this.cookieValue;
      // 设置Axios的默认请求头,添加Authorization头部,携带JWT令牌
      axios.defaults.headers.common['Authorization'] = `Bearer ${jwtToken}`;
      const apiUrl = 'https://raven.zone/wp-json/wp/v2/posts';
      axios.get(apiUrl,{
        headers: {
          'Authorization': `Bearer ${jwtToken}`,
          'Content-Type': 'application/json',
        },
        params:{
          categories:33,
          status:'publish,private',
          per_page:'50'
        }
        })
        .then(response => {
            // 处理API响应
            this.token = jwtToken;
            this.result = response.data;
            this.articles = response.data;
          })
          .catch(error => {
            // 处理错误
            console.error(error);
          });
    },
    selectArticle(article) {
      // 处理用户选择文章的逻辑,可以打开文章或执行其他操作
      try {
        // 这是我定义的mindmap文章类型的格式,即将需要转成json的部分用[mindmap]xxx[/mindmap]围起来。
        const regex = /\[mindmap\](.*?)\[\/mindmap\]/
        const articleContent = article.content.rendered.match(regex)[1];
        // 直接读取的rendered会有转义,所以需要把它变回原来带有<>符号的字符串。json要用。
        const parser = new DOMParser();
        const decodedContent = parser.parseFromString(articleContent, "text/html").body.textContent;
        // 得到的思维导图数据data。
        let data = JSON.parse(decodedContent)
        if (typeof data !== 'object') {
          throw new Error(this.$t('import.fileContentError'))
        }
        // 这是王林的思维导图数据设置的函数。
        this.$bus.$emit('setData', data)
        this.$message.success(this.$t('import.importSuccess'))
        // 这是我定义的,将一些关于在线状态的设置参数传给其他函数使用。
        this.$store.commit('setIsHandleLocalFile', false)
        this.$store.commit('setIsHandleOnlineFile', true)
        this.$store.commit('setOnlineConfig', {
          token: this.cookieValue,
          ID: article.id,
          Title: article.title.rendered
        })
      } catch (error) {
        console.log(error)
        this.$message.error(this.$t('import.fileParsingFailed'))
      }
      this.cancel()
    },
    cancel() {
      this.dialogVisible = false
    }
  }
};
</script>
<!-- 一些css设置 -->
<style lang="less" scoped>
.nodeImportDialog {
  .popup{
    padding:0px
  }

  .articleList {
    padding:3px 10px 3px 10px;
    display: table;
    clear: both;
  }
  .articleItem{
    width:200px;
    display: block;
    float: left;
    margin: 5px 5px 5px 5px;
    background-color: rgb(255, 244, 230);
    list-style-type: none;
    border-radius: 5px;
    padding: 5px 5px 5px 5px;
    text-align: center;
    font-weight: bold;
    cursor:pointer
  }
}
</style>
对于另存数据,我在另存的窗口中加了输入标题的输入框和保存按钮。
新建ExportOnline.vue文件,template部分主要增加:
    <form class="saveArticleForm" @submit.prevent="saveArticle">
      <label class="saveArticleFormTitle" for="title">标题:</label>
      <input class="saveArticleFormInput" type="text" id="title" v-model="articleTitle" required>
      <button class="saveArticleFormSubmit" type="submit">确认</button>
    </form>
对应绑定的saveArticle函数内容:
    async saveArticle() {
      try {
        // 替换以下变量的值
        const apiURL = 'https://raven.zone/wp-json/wp/v2/posts';
        const jwtToken = this.cookieValue;

        // 设置请求头,包含JWT令牌
        const headers = {
          Authorization: `Bearer ${jwtToken}`,
          'Content-Type': 'application/json',
        };

        // 准备文章数据
        let data = getData();
        let string = JSON.stringify(data);
        const articleData = {
          title: this.articleTitle,
          // 可以添加其他文章相关的数据
          content: `[mindmap]${string}[/mindmap]`.replace(/[<>&"]/g,function(c){
            return {'<':'<','>':'>','&':'&','"':'"'}[c];
          }),
          status:'private',
          // date_gmt:this.utcTime, //wordpress会自动处理时间,所以不需要特别指定时间
          // date:this.localTime,
          categories: [33]

        };
        Notification.closeAll()
        Notification({
          title: this.$t('toolbar.tip'),
          message: this.$t('toolbar.savingOnlineFront') + this.articleTitle + this.$t('toolbar.savingOnlineEnd'),
          duration: 0,
          showClose: true
        })

        // 发送POST请求保存文章
        const response = await axios.post(apiURL, articleData, { headers });

        // 处理成功的响应,可以根据需要进行路由跳转或其他操作
        console.log('文章保存成功', response.data);
        this.$store.commit('setIsHandleOnlineFile', true)
        this.$store.commit('setOnlineConfig', {
          token: this.cookieValue,
          ID: response.data.id,
          Title: this.articleTitle
        })
        this.cancel();
      } catch (error) {
        // 处理错误
        console.error('保存文章失败', error);
      }
    }
回到最外层的Toolbar.vue文件,定义保存函数:
    async saveOnlineFile() {
      if(!this.$store.state.isHandleOnlineFile){
        <!--如果现在的状态不是正在编辑在线文件,就打开另存在线的弹窗。如果正在编辑在线,就直接保存-->
        this.$bus.$emit('showExportOnline')
      }else{
        let data = getData()
        const apiURL = `https://raven.zone/wp-json/wp/v2/posts/${this.$store.state.onlineConfig.ID}`;
        const jwtToken = this.$store.state.onlineConfig.token;

        // 设置请求头,包含JWT令牌
        const headers = {
          Authorization: `Bearer ${jwtToken}`,
          'Content-Type': 'application/json',
        };
        let string = JSON.stringify(data)
        const articleData = {
          // 可以添加其他文章相关的数据,这里只更新内容。
          content: `[mindmap]${string}[/mindmap]`.replace(/[<>&"]/g,function(c){
            return {'<':'<','>':'>','&':'&','"':'"'}[c];
          }),
        };
        // 发送POST请求保存文章
        const response = await axios.post(apiURL, articleData, { headers });

        // 处理成功的响应,可以根据需要进行路由跳转或其他操作
        console.log('文章保存成功', response.data);
        this.$message.success(this.$t('export.saveSuccess'))
      }
    },
对于这几个按钮的图标,我直接使用了王林的思维导图应用中没用到的几个图标。
最后的效果:

定义wordpress文章格式用于存储思维导图json数据
我尝试过使用meta data,但是不太方便,不如直接改到正文。
我在wordpress中新建了一个分类叫mindmap,约定了思维导图对应的json内容转成的字符串要被放在[mindmap][/mindmap]中间。
其他的没什么好说的了,上面的vue中也写好了的。
身份验证
wordpress REST API接口
wordpress提供了REST API接口,在其它应用中可以通过对特定链接发送http请求,获取信息。我基于该接口实现思维导图的读取 保存等功能。
相关文档地址:
https://developer.wordpress.org/rest-api/requests/
但是默认的REST API接口不带身份验证的功能,因此我在wordpress中安装了插件。
在wordpress安装插件的页面,可以搜到三个插件,分别是:
- JWT Auth: https://cn.wordpress.org/plugins/jwt-auth/
- JWT Authentication for WP-API: https://cn.wordpress.org/plugins/jwt-authentication-for-wp-rest-api/
- WordPress REST API Authentication: https://cn.wordpress.org/plugins/wp-rest-api-authentication/
看时间的话,JWT Auth貌似已经过期了,最新支持6.1的WP;JWT Authentication for WP-API看起来支持6.4以上的WP,而WordPress REST API Authentication是付费插件,也不开源。
随后,在尝试过程中发现,JWT Authentication for WP-API没有方便在WP后台调用的生成令牌的函数,最后还是选择了JWT Auth,感觉内部代码更容易看懂。
WP在登录时发送cookie
我采用了wordpress的JWT Auth插件用于发放和验证JWT令牌。
在配置时,需要在wordpress的.htaccess文件中添加:
RewriteEngine on
RewriteCond %{HTTP:Authorization} ^(.*)
RewriteRule ^(.*) - [E=HTTP_AUTHORIZATION:%1]
同时,在wordpress的wp-config.php中添加:
define('JWT_AUTH_SECRET_KEY', '*****');
define('JWT_AUTH_CORS_ENABLE', true);其中***是我的jwt令牌。
值得注意的是,JWT Auth的文档并没有说这一段要加在哪,所以我加在了最后。然而这样最后生成的token是无效的。
这一段要加在原本自有的Authorization相关密钥的旁边,在WP相关配置函数启动之前!!
同时我利用了wordpress的wp_login钩子,实现在wordpress登录时发放一个JWT令牌。
/* 乌鸦自定义 */
use JWTAuth\Auth;

// 自定义登录成功后的动作
function custom_login_success_action($user_login, $user) {
    // 生成JWT令牌
    echo '<script>';
    echo 'console.log("Hello from PHP!");';
    echo '</script>';

    // $user = wp_authenticate($username, $password);

    // if (is_wp_error($user)) {
    //     // 用户验证失败,处理逻辑(如果需要)

    //     return;
    // }

    // 用户验证成功,生成JWT令牌
    echo '<script> console.log(' . $user_login . ');</script>';
    $jwt_token = generate_jwt_token($user);
    echo '<script> console.log(' . $jwt_token. ');</script>';
    // $jwt_token = 'sfsffffffffjwtme';
    // echo '<script>';
    // echo 'console.log("jwt_token=' . $jwt_token . ');';
    // echo '</script>';

    // 将令牌发送给客户端(在这个例子中,通过JavaScript设置一个cookie)
    setcookie('jwt_token', $jwt_token, time() + 36000, '/', '', false, true);
    // echo '<script>document.cookie = "jwt_token=' . $jwt_token . '";</script>';

}
add_action('wp_login', 'custom_login_success_action', 10, 2);

// 生成JWT令牌
function generate_jwt_token($user) {
    // 使用插件提供的函数生成JWT令牌
    $pluginInstance = new Auth();
    $token = $pluginInstance->generate_token($user->ID);

    return $token;
}
域名问题
问题:发放令牌后,发现cookie中的jwt_token的domain是raven.zone,这意味着我在vue调试中使用的localhost无法访问到这个token,同时它的httponly被设为√。
所以一方面在测试时要把domain设置成localhost,另一方面要去掉httponly的标志。参考:
https://blog.csdn.net/weixin_40686603/article/details/116188863
在查找资料以后,了解到php的setcookie函数可以直接指定域名和httponly等标志,因此将setcookie一句改成:
setcookie('jwt_token', $jwt_token, time() + 36000, '/', 'raven.zone', false, false);这样的话所有raven.zone的二级域名都能检索到该cookie,同时设置了httponly为false。
同时,可以通过改host等方法,将local.raven.zone解析成127.0.0.1,这样就可以用http://local.raven.zone:8889 访问到我本地的vue服务器,同时在这里可以拿到raven.zone发放的cookie。
我懒得改host,所以直接让dns服务器解析了local.raven.zone,效果也是一样的。
喔,还有,需要改vue的配置文件,不然访问不了local.raven.zone这个域名。具体代码待更新。
令牌报错
403 (Forbidden) -- JWT is not configurated properly, please contact the admin
https://github.com/Tmeister/wp-api-jwt-auth/issues/59
Rest API支持汇总
https://developer.wordpress.org/rest-api/requests/
vue应用提交请求
查阅文章
待更新
创建文章
待更新
修改文章
待更新


Risk assessment involves two parts: risk analysis and risk evaluation, although the term 鈥渞isk assessment鈥?can be seen used indistinguishable with 鈥渞isk analysis鈥?
Whereas Reach鈥檚 total map selection is a bit weaker than the likes of Halo 2 and Halo 3 and the inclusion of armor talents was cool, but limiting – remember, this was before sprinting grew to become a everlasting means in Halo – I firmly believe that Sword Base is the best Halo map of all time and its inclusion alone elevates Attain to all-time standing in my eyes.
What’s alternative clothes? The place can I find gothic, rock, and different fashion at HARD鈥橬鈥橦EAVY?
三人寄れば文殊の知恵